Cheesecakes need time to season- they are worth the wait! We hate that we don't currently have a picture of this beautiful cheesecake, which just means we need a thinly veiled reason for making another one in the next few days-
Use your food processor to make the ultimate graham cracker pie crust:
Graham Cracker Crust
2 cups finely ground graham crackers
1/2 cup white sugar
1/2 teaspoon ground cinnamon
1/4 teaspoon ground cloves
1/4 teaspoon ground nutmeg
8 Tablespoons melted unsalted butter
Combine in processor and press into 10 inch springform pan.
Caramel Sauce
2 Tablespoons unsalted butter
1/2 cup light brown sugar
1/2 teaspoon lemon juice
dash of salt
1/4 + 1/8 cup heavy cream (or use same amount of milk but add 1 T. butter)
1 teaspoon vanilla
Melt the butter over medium heat. Add brown sugar, lemon juice and salt. Cook and stir until bubbling, about 4 minutes.
Remove from heat and add the cream or milk. Whisk and return to low heat. Cook for 10 minutes without stirring. Remove from heat and add vanilla. Let cool to room temperature.
Apple Cheesecake Recipe
1 can apple pie filling
2 (8 ounce) packages cream cheese, room temperature
1/2 cup white sugar
1 teaspoon vanilla
2 eggs
Preheat oven to 350*f. Pour the apple pie filling into prepared graham cracker crust.
In a large bowl whip the cream cheese until fluffy. Add sugar, vanilla and eggs and mix until smooth. Pour over the apple pie filling.
Set the springform pan onto a cookie sheet and place in preheated oven. Bake for 35 minutes. Turn off the oven and let the cake set in oven for two hours but DO NOT OPEN OVEN. (this helps keep the cake from cracking)
Remove from oven and let cool to room temperature. Spread caramel sauce evenly over the top. Cover loosely and set in refrigerator for 24 hours to season.
Let us know what you think! This recipe may sound a bit strange from the typical, New York-Style cheesecakes but believe us when we say it is well worth the effort!
 Warm fires, the smell of apple cider with mulling spices, cozy evenings spent thawing the chill after playing in the snow- these are the memories that rise up from the taste and aroma of Apple Cider Buttercream; use it to top your favorite mildly spiced cake recipe then sit back and enjoy the reactions. Apple Cider Buttercream Recipe4 cups powdered sugar 1/2 tsp. cinnamon 1/2 cup heavy whipping cream 1/2 cup unsalted butter, room temperature 1/4 cup apple juice or cider 1 tsp. vanilla Sift together your powdered sugar and cinnamon in a small bowl; set aside. In a large mixing bowl, whip the heavy cream with electric mixer on high until fluffy. Add butter, juice and vanilla and blend on low. Pour in the powdered sugar mixture and mix on medium until creamy buttercream forms. Use it to top your favorite white, yellow or spice cake. Please share your comments and experiences; we would love to know what your reactions have been!
 So did anyone try the cake batter fudge? So far our taste-test-guinea-pigs (aka our children lol) have tried the white and red velvet versions, both with the benefit of white chocolate morsels. Yesterday they informed us that the white fudge is superior to the red velvet. (Of course, both kinds disappeared just as fast!) It was requested that we make a peanut butter version, so that is what we will be working on today. Get creative, try different combinations; the great thing with this recipe is that there are so many varieties of cake mix out there. Carrot cake spiced fudge? Let us know what you think!
 One box of cake mix, your choice
3 cups of powdered sugar
3/4 cup real butter, diced
1/4 + 1/8 cup milk
3/4 cup chocolate chips
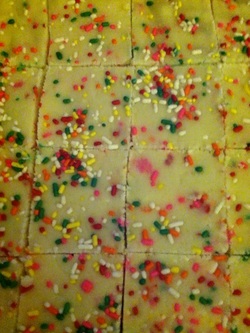
1/2 cup sprinkles
In a microwaveable bowl, mix together the cake mix and powdered sugar. Lay the butter on top, and pour in the milk. Don't worry about stirring just yet. Pop the bowl in the microwave for 2 minutes on High. Stir well, then add the chips. Microwave for 30 seconds on high. Stir and spread into a butter 9x13 cake pan. Chill to set, then enjoy!
I'm excited about making these. My daughter and I made this batch the other night using a white cake mix and white chocolate chips. Tomorrow we are going to try it using a red velvet cake mix and rather than adding the second time in the microwave, we'll just leave them solid in the fudge. I would like to make it using chocolate cake mix and semi sweet chocolate chips as well. Yum, Yum, YUM! :)
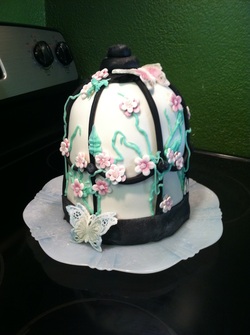 Today we will discuss how to finish off your birdcage cake. Don't despair if fondant is a little intimidating, it takes practice. However, with this cake you can also cover the main body in buttercream and use fondant for the accents.
Make sure that your work surface is generously coated with powdered sugar or cornstarch. You can also use two pieces of parchment paper. Start by placing your room-temperature fondant in the center of your workspace. Flatten it with your palm as much as you can without tearing it. Then use a large rolling pin to work from the center of your fondant out. You want to make the circle large enough to drape over the cakes. As you drape the fondant, work your way around with your palm, smoothing as you go. This takes practice, but if you get a few mistakes you can always cover it with a flower, leaf or vine later on. Cut a strip of paper about an inch wide and long enough to fit around the cake at the widest area. Wrap around cake, and cut to fit. Fold your paper strip in half then half again. Open the strip up, wrap around cake and tape the ends. At each fold that you made, make a mark. Move the paper up three inches, tape and mark at each fold again. Remove the paper. Using a pizza cutter or sharp knife, cut a 1/2 inch wide strip the height of the cake, and one for each place that you made a mark. Using a food-only paint brush, apply a small amount of water or vodka to the white fondant at each area that you marked, vertically. Gently apply the strips from top center of the dome, down to the bottom. Use your paper strip as a guide, cut a 1 inch wide strip of black fondant long enough to go around the cake at the very base and apply with paint brush and water. (A very small amount of water or vodka goes a long way!) Cut another strip, 1/2 inch wide and long enough to circle the cake and apply this three inches above the first strip. Using a 4 inch diameter cookie cutter or glass, cut a circle to put on the top of the dome; this will also cover the ends of your vertical strips. You can use a toothpick or fork to make holes in the circle, to add interest. Attach with the water/vodka and brush. Make "rivets" out of the black fondant; just make small balls then flatten slightly. Attach these wherever the vertical and horizontal strips cross. Make a 1 inch ball and flatten slightly. Attach this with a little water or vodka to the very top of the cake dome, centered on the black circle. Repeat this step and make the second ball roughly 1/2 inch and attach to the top of the first ball. You can brush the black fondant with edible metallic paint in silver to create a more realistic finish. Use a dry paintbrush and dry edible paint or liquid paint. Mix up some buttercream icing and tint green. Use small pastry bag with #2 tip to make vines around your cake. Finish up your birdcage by attaching flowers with a dab of buttercream. Enjoy, and remember! It is a piece of art, meant to be eaten.
The foundation of this tall, slender cake is five layers of cake, each 6 inches in diameter. Use the master cake recipe, in your choice of flavors, and make sure to wrap the first 4 pans with the wet towel strips in order to lessen the chance of doming. The fifth, which will be our "dome" we want to let rise.
Bake, wrap and freeze each of the cakes as discussed in our earlier blog.
Prepare your buttercream frosting.
Before you lay the first layer on your cake plate, spread a layer of frosting on the plate to adhere the cake. Lay the first layer down, and frost. Repeat with the next layer. Use 3-4 heavy straws or wooden dowels cut to the height of your first two layers and insert them into the cakes for support. This is crucial.
Before you build your cake any higher, lay a cake board cut the same diameter of your cakes onto the existing layers and then lay and frost the third and fourth layers. Use the same straw or dowel rod method to support the top two layers, and top with another cake board.
With the rounded dome up, place the final cake on the top. Frost the dome, and down and around the cake to give it a smooth finish.
You can choose to start your decorating here, or continue on to cover the cake with fondant.
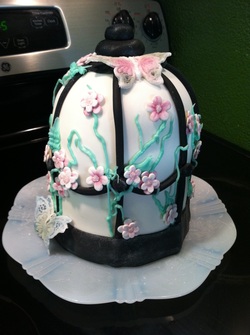 The birdcage cake is five layers tall, with buttercream frosting covered with vanilla fondant and fondant flowers and butterflies.
We wanted to make this unique cake for Momma Juliette, because she is the standard in ladylike behavior and we wanted this to reflect that quality.
We very (very) seldom buy fondant. Not many people care for the taste of the store bought kind, so we just make our own. It is like playdo for grownups, after all. :) And with the cost of purchased fondant running you about $9 per pound, it is much cheaper to make your own. This batch cost us $3.65. However, for this cake, we did buy the black fondant. It is difficult to get your fondant to a true black without a heavy compromise on the flavor. For the white fondant and the flowers, we made our own:
Marshmallow Fondant:
10 ounce bag of mini marshmallows
1 Tablespoon water
1/2 tsp. salt
1 tsp. lemon juice
1 1/2 tsp. light corn syrup
1 tsp. clear vanilla
1/2 tsp. lemon extract
2 pound bag of powdered sugar
vegetable shortening
In a large microwaveable bowl, combine the marshmallows with the salt and water. Melt in 30 second increments, stirring between each, until completely smooth, no lumps left.
Stir in the lemon juice, corn syrup, vanilla, lemon extract and most of the powdered sugar.
Grease your hands and counter surface with the shortening. Scrape the marshmallow mix onto the counter and sprinkle the rest of the sugar onto it. Now, just like kneading bread, you will work the sugar into the marshmallow mix. Keep just enough shortening on your hands to prevent it from sticking to you, but go light on it because it can degrade the integrity of the finished fondant. Keep kneading the mass until it is very smooth and pliable.
Wrap tightly in plastic wrap and leave on counter to "cure" for a few hours or use right away. Your fondant will store in the refrigerator if tightly wrapped but you will discover that fresher fondant is much easier to work with.
When you are ready to start creating with your fondant, spread either corn starch or powdered sugar on the surface you will be using to roll out the fondant. You can also use two pieces of parchment paper and roll the fondant out between them. For the flowers and butterflies, we use cutters that we purchased from Country Kitchen Sweetarts. Roll out a thin layer (1/8th inch) of fondant and press the cutter into it. You can also purchase a blossom cutter set that cuts the flower shape out with the cutter, then you lay the cut flower on a veiner and press down with the cutter to create lifelike designs on the blossom. Create enough of these so that you will not run short when applying them, around 15-20. For the butterflies, you will want to roll out a small amount of fondant to about 1/8th to 1/16th inch thick. Lay it on the butterfly lace silicone mold and gently press it into all the nooks and crannies. Top it will the second piece of the mold to give it a 3d effect. Use a small amount of pressure on the mold to make sure you get all of the shapes into the fondant. Use either a toothpick or fondant stick to work the excess fondant from around the edges of the mold to give it a nice, clean look. You can also use the same tool after you remove the fondant from the mold to remove bits and pieces of the fondant where you want more detailing. Let the blossoms and butterflies dry, while you prepare a small portion of royal icing to create the centers of the flowers. Royal icing sounds intimidating but it really is very simple and this recipe only costs about $.24. Royal Icing Recipe
1/2 cup powdered sugar
1 1/2 tsp. cornstarch
1 tsp. lemon juice
2-3 tsp. water
colored sugar crystals
Combine your powdered sugar with the cornstarch, then add the lemon juice. Mix very well; it will appear somewhat dry. Add in the water, 1 tsp. at a time until it is the right consistency. For this recipe, you want it to be somewhat runny. You can either put it in a piping bag with a #2 tip, or you can just use a toothpick to place a drop of royal icing in the center of each flower. Drop the flower blossom into some colored sugar crystals and set aside to dry.
 Earlier today we posted on the Master Cake recipe, and the pans to assemble to make this very frilly, very feminine cake. Now, we will discuss where to go from there. You have your master mix created, and now you need to know how many individual mixes to make. The master mix recipe makes what is the equivalent of three box mixes. You will need one mix for the belly, and two for the foundation/dress top. Preheat your oven to 325*. Start with the foundation. You have the mix divided up into three separate bags. Mix together the ingredients from two of these, grease your 9x13" and two small oven safe bowls. Put 1/2-3/4 cup of batter in each small bowl, and pour the rest into the 9x13". Wrap the 9x13" with wet towel strips and set the small bowls onto a cookie sheet. Bake for 25 minutes, then start checking for doneness. The 9x13" may take up to 40 minutes or so total. Allow to cool in pan for 10 minutes then turn out onto cooling rack. Mix together one cake mix worth for the belly. Grease the pan or bowl that you will be using and pour batter in. Place the pan or bowl into another slightly larger to help reduce the doming of the finished cake. Bake for 45-50 minutes or until it tests done. Once done, cool for 10 minutes in pan then turn out onto cooling rack. After your cakes have cooled slightly, carefully wrap in cling wrap and place in freezer. Allow them to freeze several hours to overnight.
 While your cakes are cooling their heels, it is time to mix up the frosting. We like to use buttercream, because it is so versatile. You will need enough to cover all four of your cakes.
Vanilla Buttercream Recipe
6 cups powdered sugar
2 cups softened butter
2 tsps. vanilla
4-8 Tablespoons heavy cream
Beat butter with mixer until creamy; add powdered sugar and beat on medium for 3 minutes. Add the vanilla and cream, beat until fluffy. Add more cream as needed to reach desired consistency.
Take your frozen cakes out of the freezer, position the belly and top onto foundation. Cut out slight half circles between belly and dress top on foundation. Position the top of the dress cakes and cut a small slice from inside of both so that they fit together more naturally. Remove the cakes from foundation and starting with 9x13" give it a nice crumb coat with the buttercream. Don't overly fret if you can't get it smooth or crumb-free because this layer won't show.
After you frost all four cakes, place the top three back onto the foundation 9x13". Set aside while you make the crusting buttercream.
 Crusting Buttercream or Faux Fondant Recipe
1 1/2 cups vegetable shortening
1 cup flour minus 2 Tablespoons
2 Tablespoons corn starch
2 pounds or 8 cups powdered sugar
1/4 to 1/3 cup hot water
2 tsp. vanilla
frosting color gel
large frosting bag and flat tip
small frosting bag and star tip
Cream together shortening, flour and cornstarch. Stir in vanilla, and mix in sugar and hot water. Mix on low, adding more hot water as needed to make it frosting consistency.
Remove 2 cups of frosting and place in smaller bowl. Add frosting color gel to reach darkest color that you want.
Using a tall, narrow glass, assemble the frosting tip to bag and then position the bag into the glass with the opening of the bag pulled out and over the top of the glass.
Put one cup of darkest frosting into frosting bag. Set aside.
Take one cup of the white frosting and mix with colored frosting in bowl. Put one cup of this slightly lighter mix into frosting bag. Set aside.
Continue adding white frosting to the colored frosting in progressive stages to make your frosting get lighter and lighter in color as you finish off the frosting bag. Make sure you save one cup of white frosting for the top of the dress. Close top of bag and prepare to frost your belly bump cake.
Starting past the bottom edge of the 9x13" begin creating your ruffle by moving the flat tip of the frosting bag up and down. Continue doing this all the way across bottom of cake. Repeat layers, always "attaching" the newest ruffle just above the previous one, until you cover the belly. Stop at the flat area between the belly and dress top. Drag the frosting tip across to create a "belt." Set frosting bag aside.
Using a smaller bag with star tip attachment and filled with remaining white frosting, create small stars in rows across each breast area and cover top edge of the foundation cake as well.
Using large frosting bag, create two ruffles on the top edges of each breast to make the dress top.
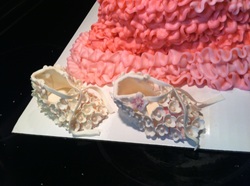
Finish off your design with a gumpaste flower and royal icing or gumpaste pendant. Keepsake baby shoes are also made from gumpaste.
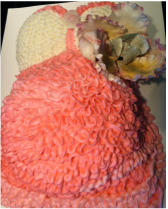
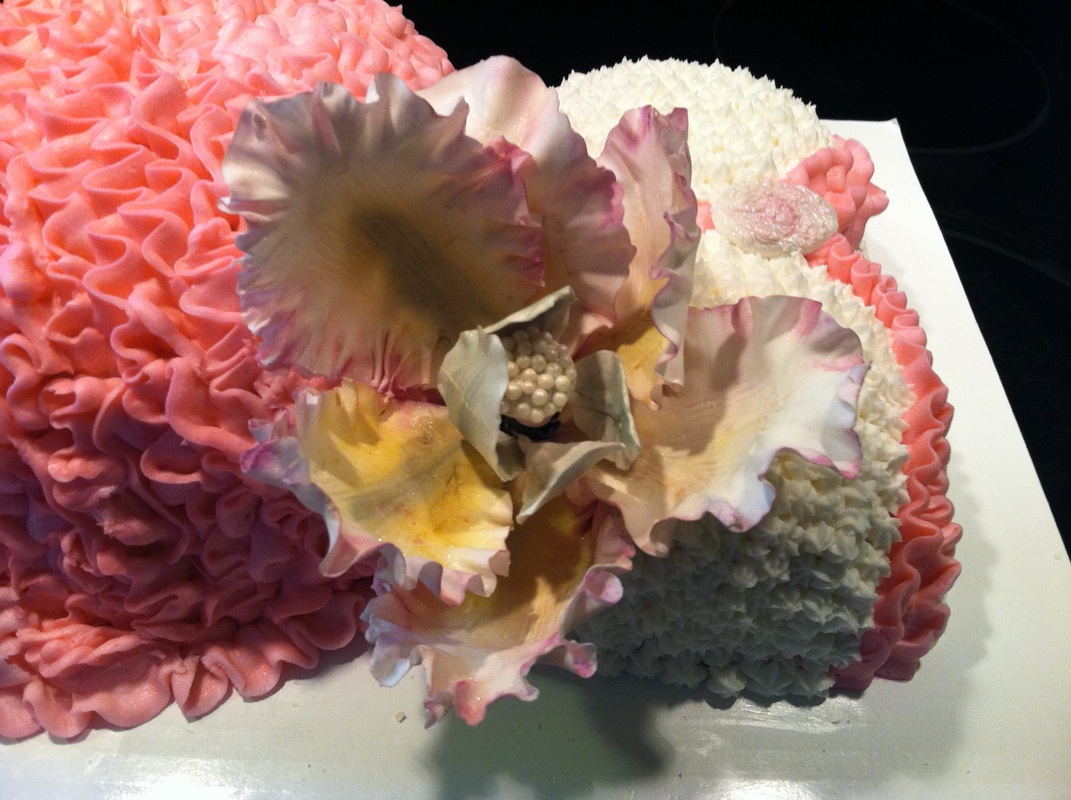
So yesterday was our friend Jessica's very first baby shower. She asked if we would create a unique cake for her, but she really does not like fondant. What we came up with was a baby bump cake, French vanilla cake covered with vanilla buttercream and ruffled in frilly crusting buttercream. Because this type of cake is somewhat involved we will break the steps down into separate entries. The first is to make your cake mix foundation, and then to decide what flavor you would like to go with from there. 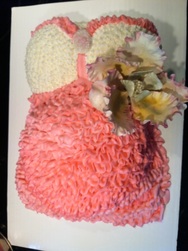 The frilly flower is a tulip created from gumpaste, and the pendant on the dress is from royal icing.
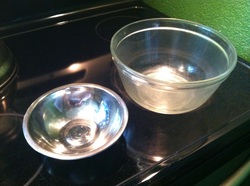 The very first thing that we had to do was find a suitable mold for the belly portion. For this cake we used Wilton's Soccer Ball pan, but we have been known to use a medium size pyrex bowl as well; anything that is oven-safe and provides the shape that you want will work.
The foundation cake you want to be a quarter sheet, or 9x13, and the top of the dress is made from two small oven-safe bowls.
Cake pan release recipe:
Use a good cake-pan spray or make your own from equal parts oil, shortening and flour. Blend very well and keep in an airtight bowl in the fridge. When ready to use, spread a thin layer on bottom and sides of pan.
We don't buy cake mixes, we always make our own. You can do the same by following this recipe:
Master Cake Mix Recipe:
7 cups all purpose flour, sifted then measured
1/2 cup corn starch
1 Tablespoon salt
4 1/2 cups sugar
2 Tablespoons baking powder
3/4 cup cold butter, not margerine
Combine the sifted flour with the cornstarch, salt, sugar and baking powder. Put 2 cups of this into a food processor and add the butter. Blend until it forms very small crumbs. Add back into flour mixture and mix well.
Separate into three freezer bags, 4 cups to a bag. This will equal one cake mix, which you can turn into yellow, white, spice and chocolate cakes. When you are ready to use the mix, make sure that you allow it to come to room temperature, or place flattened bag in microwave for 30 second intervals until it no longer feels cold, no more than one minute.
Yellow Cake:
4 cups cake mix
3 eggs
2 tsp vanilla
1/2 cup oil
1cup milk
Make a well with the mix, then add in the eggs, vanilla, oil and milk. Mix for 3 minutes on Medium. Remember, longer does not mean better batter, and you need 3 minutes for the batter to change, so it pays to time it. Pour into greased pans, wrap with wet towel strips and place into325* preheated oven. A 9x13 will take 30-40 minutes. Check with toothpick for doneness.
White Cake:
4 cups cake mix
4 egg whites
2 tsps. clear vanilla
1/2 cup oil
1 cup milk
Make a well with the mix, then pour in the rest of the ingredients. Mix on medium for 3 minutes. Pour into greased pans, wrap with wet towel strips and place in 325* preheated oven. A single layer 9x13 will be 30-40 minutes. Use toothpick to check for doneness.
Spice Cake:
4 cups cake mix
1/8 tsp. cloves
1 tsp. cinnamon
1/8 tsp. allspice
1/2 tsp. nutmeg
1/2 cup oil
1 cup milk
2 tsp. vanilla
Put cake mix in medium bowl. Add in spices and mix well. Make a well, add eggs, oil, milk and vanilla. Mix on Medium for 3 minutes. Pour into greased pans, wrap with wet towel strips, place in preheated 325* oven and bake 9x13 for 30-40 minutes. Use toothpick to check for doneness.
Chocolate Cake:
4 cups cake mix
2 tsp. vanilla
1/3 cup oil
1/4 cup hot water
1/2 cup cocoa powder
3eggs
1 cup milk
Make a well in center of mix. Add vanilla, oil, eggs and milk. Beat on low for 1 minute, scrape down sides.
Add cocoa powder to the hot water, mix well and add to flour mixture. Beat on medium for 2 minutes.
Pour into greased pan and wrap with wet towel. Place in 325*F preheated oven and bake 9x13 for 30-40 minutes, or until checks done with toothpick.
I'm pretty sure that somewhere in the Garden of Eden there must have been a cake. Ok, so maybe not right away but soon after. Anyway they seem like a near-perfect dessert to me lol.
I love the aroma of cakes when they are baking, and even when they are boxed and ready to go to their new home I will sneak a whiff. There is something very comforting about them, and when done well they tend to leave smiles in their wake. Realtors know that the sense of smell is so important in making someone feel welcome and at home that they often-times will have cookies or cake freshly baked at an open house event.
For me the chance to wow someone and see the reaction on their face is what I am in the business for. Of course I am always extremely nervous when the cake is complete and I am waiting for the big "Oh...that's just not what I really wanted..." reaction. So far so good, but it's lingering out there somewhere.
The first cake that we did was for my son's graduation. It was okay, but the fondant was thick and the whole thing screamed "SUGAR!" Since then we have learned a few tricks of the trade, and I am pretty happy with where we are going. I look forward to new challenges just to see if we can do it, plus it's always fun to create something new.
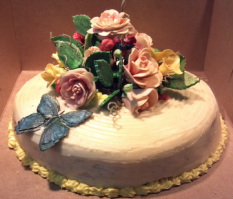
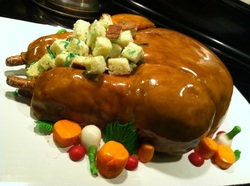 Our latest cake was the vanilla turkey cake. Or as John calls it, a " turcake," lol. That one was a blast to make, and it gave us the opportunity to work with a new medium- caramel....yum. I think this one will become a holiday standard along with a sweet apple cheesecake. Instead of the routine cake-frosting-fondant, it was cake-frosting-caramel. And where I expected the caramel to be difficult to work with, it was really quite simple and not at all sticky. The veggies are fondant and the "stuffing" is pound cake. The journey from our first cake to the most recent one was fun to say the least. Since then we have moved forward to create all kinds of specialty cakes, including birthday cakes, sculpted cakes, cupcakes, cheesecakes, handcrafted chocolates, cookies and sugar flowers (gumpaste or fondant flowers http://www.weebly.com/weebly/main.php##) We considered it a bonding experience and gave us a common goal and project to focus on. Along the way we have made many new friends, learned a lot about each other (and our patience level), and found that our families are loyal supporters even when we may not deserve it. So maybe God did create cake after all.
|
 RSS Feed