The foundation of this tall, slender cake is five layers of cake, each 6 inches in diameter. Use the master cake recipe, in your choice of flavors, and make sure to wrap the first 4 pans with the wet towel strips in order to lessen the chance of doming. The fifth, which will be our "dome" we want to let rise.
Bake, wrap and freeze each of the cakes as discussed in our earlier blog.
Prepare your buttercream frosting.
Before you lay the first layer on your cake plate, spread a layer of frosting on the plate to adhere the cake. Lay the first layer down, and frost. Repeat with the next layer. Use 3-4 heavy straws or wooden dowels cut to the height of your first two layers and insert them into the cakes for support. This is crucial.
Before you build your cake any higher, lay a cake board cut the same diameter of your cakes onto the existing layers and then lay and frost the third and fourth layers. Use the same straw or dowel rod method to support the top two layers, and top with another cake board.
With the rounded dome up, place the final cake on the top. Frost the dome, and down and around the cake to give it a smooth finish.
You can choose to start your decorating here, or continue on to cover the cake with fondant.
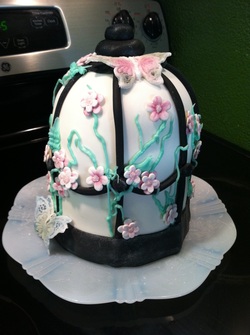
We wanted to make this unique cake for Momma Juliette, because she is the standard in ladylike behavior and we wanted this to reflect that quality.
Marshmallow Fondant:
10 ounce bag of mini marshmallows
1 Tablespoon water
1/2 tsp. salt
1 tsp. lemon juice
1 1/2 tsp. light corn syrup
1 tsp. clear vanilla
1/2 tsp. lemon extract
2 pound bag of powdered sugar
vegetable shortening
In a large microwaveable bowl, combine the marshmallows with the salt and water. Melt in 30 second increments, stirring between each, until completely smooth, no lumps left.
Stir in the lemon juice, corn syrup, vanilla, lemon extract and most of the powdered sugar.
Grease your hands and counter surface with the shortening. Scrape the marshmallow mix onto the counter and sprinkle the rest of the sugar onto it. Now, just like kneading bread, you will work the sugar into the marshmallow mix. Keep just enough shortening on your hands to prevent it from sticking to you, but go light on it because it can degrade the integrity of the finished fondant. Keep kneading the mass until it is very smooth and pliable.
Wrap tightly in plastic wrap and leave on counter to "cure" for a few hours or use right away. Your fondant will store in the refrigerator if tightly wrapped but you will discover that fresher fondant is much easier to work with.
For the flowers and butterflies, we use cutters that we purchased from Country Kitchen Sweetarts. Roll out a thin layer (1/8th inch) of fondant and press the cutter into it. You can also purchase a blossom cutter set that cuts the flower shape out with the cutter, then you lay the cut flower on a veiner and press down with the cutter to create lifelike designs on the blossom. Create enough of these so that you will not run short when applying them, around 15-20.
For the butterflies, you will want to roll out a small amount of fondant to about 1/8th to 1/16th inch thick. Lay it on the butterfly lace silicone mold and gently press it into all the nooks and crannies. Top it will the second piece of the mold to give it a 3d effect. Use a small amount of pressure on the mold to make sure you get all of the shapes into the fondant. Use either a toothpick or fondant stick to work the excess fondant from around the edges of the mold to give it a nice, clean look. You can also use the same tool after you remove the fondant from the mold to remove bits and pieces of the fondant where you want more detailing. Let the blossoms and butterflies dry, while you prepare a small portion of royal icing to create the centers of the flowers.
Royal icing sounds intimidating but it really is very simple and this recipe only costs about $.24.
1/2 cup powdered sugar
1 1/2 tsp. cornstarch
1 tsp. lemon juice
2-3 tsp. water
colored sugar crystals
Combine your powdered sugar with the cornstarch, then add the lemon juice. Mix very well; it will appear somewhat dry. Add in the water, 1 tsp. at a time until it is the right consistency. For this recipe, you want it to be somewhat runny. You can either put it in a piping bag with a #2 tip, or you can just use a toothpick to place a drop of royal icing in the center of each flower. Drop the flower blossom into some colored sugar crystals and set aside to dry.
 RSS Feed